Processing Personal Orders to EasyBookPrep
This tutorial guides you through the steps to process your personal orders on Amazon and send the order data to EasyBookPrep using a specific extension.
Updated 1 month ago
Introduction
Welcome to our tutorial on processing personal orders and sending data to EasyBookPrep. In this guide, we will walk you through the entire process, from ensuring you are on the correct Amazon page to downloading your order data and submitting it via our extension. Whether you are new to this process or looking for a refresher, this tutorial will provide you with the necessary steps.
How to Instructions
1. Verify Your Amazon Account Type
Ensure that the top right corner of your Amazon page does not display Amazon Business. If it does, this tutorial is not applicable to you, and you need to refer to the business order processing guide (much simpler process!).

2. Click on the Extension
Initiate the process by clicking on our extension while on the Amazon page.

3. Access Data Retrieval
Once you have clicked the extension, locate and click on the green button to proceed.

4. Request Your Data
Click here to obtain your data. A prompt will appear guiding you through the necessary steps.

5. Navigate to Your Orders
Go to your orders section. A pop-up will provide you with instructions to submit this request for your order data.

6. Check Your Email
Amazon will inform you via email that you need to click on the link provided to receive your data.

7. Confirm Your Data Request
Open the email titled information data request and confirm your data request.

8. Amazon Confirms Data Request
A confirmation page will indicate that the data retrieval is in progress. Please note that it may take time for your data to be processed.
9. Monitor Your Email for Updates
Wait for Amazon to send you an email stating that your data is ready. This process can take anywhere from a few minutes to a couple of hours (2 days max)

10. Download Your Data
Once you receive the email, click on the link to download your data.

11. Save the Orders Zip File
Download the your orders zip file from the page that appears.

12. Upload Your File
After the file has been downloaded, a pop-up will guide you to choose the file for submission.
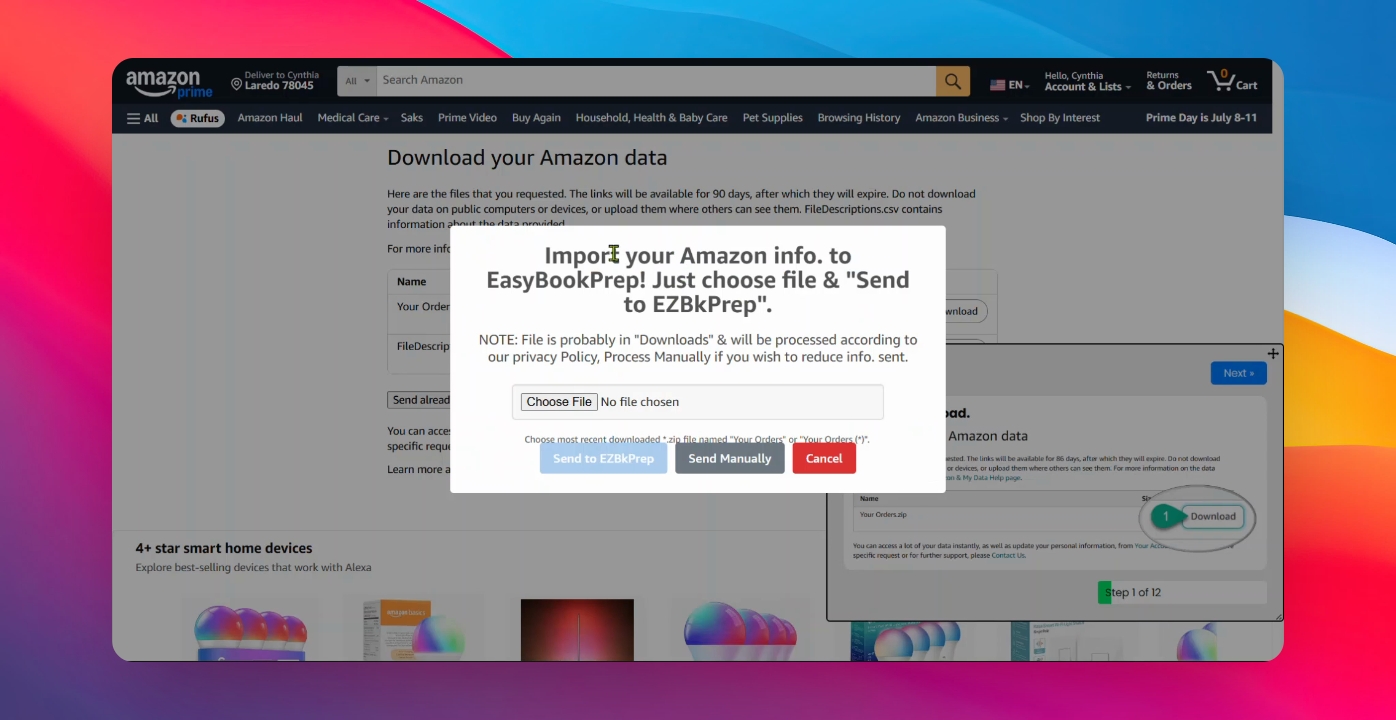
13. Select the Correct File
Click on choose file and select the file that corresponds to your orders, specifically the one with the largest number, that you just downloaded.
14. Submit the Data
Once the correct file is selected, click the button to send the data to EasyPrep. You will receive a notification confirming that your file has been successfully submitted.

15. Wait for Data Import
Please allow 2 to 3 hours for the data to be imported successfully. It should be quicker than that.
16. Conclusion
Congratulations! You have successfully processed your personal orders.
17. Need Help?
If you require additional assistance, feel free to watch the video again or contact support at help@easybookrep.com.
Conclusion
By following these steps, you can efficiently process your personal orders and send the necessary data to EasyBookPrep. Should you encounter any challenges, don't hesitate to reach out for support.